Showing posts with label chocolate. Show all posts
Second housewarming was done and no more. I am broke and tired of becoming a host.
Fiuhhh....

Here is the dessert I made. I was so lazy to cook main as usual so I ordered pizza for everyone.
Cos I still have some wonton skin leftover, I made them all to beef taco again.
Anyway, dessert is hazelnut chocolate cheesecake. I used nutella for the hazelnut and oreo for the base.
 I practically ate half of it and I couldn't finish it. Even my colleagues weren't surprised anymore, one of them said to another straight away 'You know her. She doesn't like sweet. She baked sweet stuff but doesn't eat it. Weirdo!'

Hahahhaa... I can't help but laughing. It's true but it's me. Or maybe because I have already made it, I have enough of it ;p

Recipe is from here.
It's pretty easy and simple and it is yummy.
Even I didn't finish mine, but I tasted it right?
And my colleagues had 2 each while another friend of mine came the day after and he ate 4. Yes, FOUR! Lol!


Last but not least, guess what they gave me as a gift? A coffee machine!!
Thank you. I am a happy girl.
But, I definitely need a bigger kitchen!!!!
Found this in one of the department store in Melbourne.
This is something new... hmmmm.... 
Cute and funny, huh?


Sunday baking, another chocolate macaron batch.
But this time, I use chocolate ganache for the filling which is taste way way better :))

I use different recipe and it turns out not as smooth as before but the feet is much formed and better, so not sure what causing it. Still need to practice a lot to make it perfect.


Ingredients:

3 large egg whites
125 gr almond flour
125 gr icing sugar
25 gr cocoa powder
125 gr caster sugar, divided into 2 portions

Direction:
  1. Sift the almond flour, cocoa powder and icing sugar together until you get a very fine mixture.
  2. Place the egg whites in a bowl, begin beating the whites and sugar at low-medium speed until it gets bubbles, then add half of the sugar spoon by spoon. After 2 minutes, when the mixture starts to rise and holds its shape, increase the mixer speed. Continue beating at medium speed until firm peaks are obtained. Add the rest of the caster sugar and beat until all the sugar is dissolved.
  3. Add the dry mixture, using a spatula, gently fold the mixture until the dry ingredients are completely incorporated, taking care not to overmix. The batter should be smooth and glossy and have a lava-like consistency. It should form a ribbon when dripped from the spatula.
  4. Line two baking trays with baking paper. Fill a large piping bag half full with batter and, using a 2-cm (1/2 inch) tip, vertically pipe the mixture into small mounds about the size of walnuts. The batter should be fluid enough that the macarons slowly flatten themselves out. Tap the trays against a hard surface a couple of times to remove any air bubbles.
  5. Allow to the macarons to sit for 20 to 30 minutes until a “skin” forms and they are no longer wet when lightly touched.
  6. Bake at 160 degrees C (325 degrees F) for 12 to 14 minutes. Shells should be smooth and shiny, with the characteristic “foot” or ridge underneath. You can tell when they’re done by very lightly tapping the side with a knife or fork. The macaron top should not slide but remain firmly on its foot.
  7. Remove macarons from the oven. Cool for a few moments and remove with a lifter. They should come off easily.

For the filling, I use:

50 ml thickened cream
100 gr dark chocolate, chopped corsely

Direction:
  1. Warm the cream until it boils lightly.
  2. Put the chocolate in and stir until it mixed and it's glossy.
  3. Put in the fridge for several minutes until it is a bit solid so it won't be runny when you pipe it into the macaron.


Recipe:

Ingredients:

225gr plain flour
1/4 tsp salt
1 tsp baking soda
115 gr butter
100 brown sugar
1 egg
1/2 tsp vanilla essence
113 gr white sugar

Sift together the dry ingredients and set aside. Cream the butter and sugar in the bowl of an electric mixer using the paddle attachment. Add the egg and vanilla and beat until combined. Add the sifted dry ingredients and beat until just blended.

Heat the oven to 350 degrees. Form dough into 1 1/2 inch balls. Place each ball in a cup of a greased mini muffin tin. Bake 10 to 12 minutes until edges are browned and crackled, the centers will not be completely set. Remove the cookies from the oven and use shot glass to make a small, deep well in the center of each cookie and fill with your Nutella. Transfer cookies to a rack to cool completely.


I did it! Finally I tried to make macaron. Fiuhhh...
It was such a messy process. Everything needs to be extremely clean or else your macaron won't be perfect.

But at last, I am happy with the results.
For the first time in making macaron, I am happy how it turns out.
It does not have the very perfect perfect feet but at least I get some in it :)

I will try to make again some more later until it is perfect.


I used the recipe from here


As usual, weekend is my baking day.
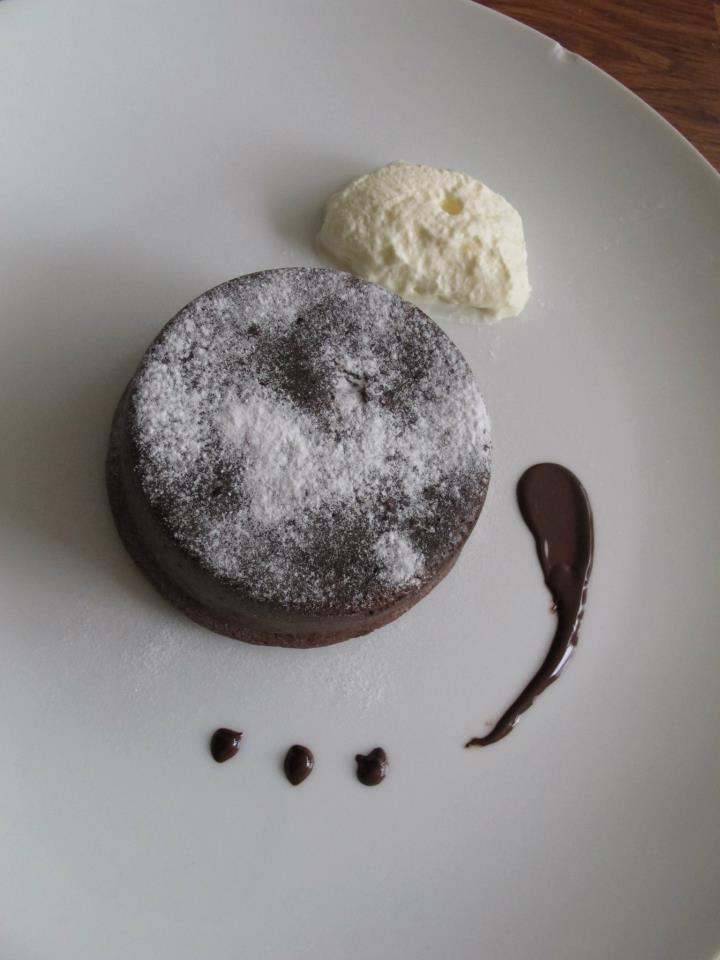
I baked this chocolate lava cake yesterday and it turned out really yummy!

Too bad I don't have ice cream or strawberry at home to complete this heavenly dessert
Anddd.... yesterday, I was neat enough to decor the plate... just need something more colorful :p


Recipe from here

Ingredients: 

2 large eggs
2 egg yolks
5 tbsp butter
3 tbsp caster sugar
100 gr dark chocolate bar
45gr plain flour
4tsp cocoa powder
pinch salt
1/8 tsp vanilla essence

Method:
  1. Butter the ramekin, put it in the large bowl, set aside.
  2. Melt butter and chocolate, put it aside.
  3. Mix the eggs and sugar until it changes to pale lemon color.
  4. Pour the chocolate and butter mix to the egg and sugar mix, stir well.
  5. Put flour and cocoa (sifted) into the batter and mix well.
  6. Add the salt and vanilla then mix well.
  7. Pour the batter into each ramekin, put in the fridge for 30 minutes.
  8. Bake in 217 degrees Celcius for 15 minutes.
ENJOY!
I am seeing this Master Chef Season 4 Episode 14 about the Pressure Test.
The 3 candidates need to make Peter Gilmore's Signature Eight-Texture Chocolate Cake.
Geez! I am watching it, I am saliva-ing, I am amazed, I am shocked, I want to eat it and I want to make it (but forget the last one).

It is so cool!! So awesome!
Like what he said in Master Chef episode:

"It was 7 main elements and there is one more, the 8th texture... the hot chocolate ganache to be served in the front of the guest as the key. When we put the ganache on the center of the cake, we went, and waited a little while... some magical happens."

God! Look so yummy!

Please do look at the pic, the video in youtube and the full video on how to make it in Master chef.

*pic from: Masterchef